In this article, we will look at how to download & install VirtualBox on Windows 64/32-bit. You can follow same process for any version of windows like Windows 11, Windows 10 (62 bit/32 bit), Windows 7 and Windows 8.
- VirtualBox is open-source software for virtualizing the computing architecture.
- It acts as a hypervisor, creating a VM (virtual machine) to run another OS (operating system) on host OS.
- The operating system where VirtualBox runs is called the host operating system.
- VirtualBox was acquired by Oracle in 2010 & now it is part of Oracle software family.
- VirtualBox can be installed on Microsoft Windows, macOS, Linux, Solaris and OpenSolaris.
First we will look at how you can download VirtualBox. Please follow below steps to download your VirtualBox installer, it’s open source free software own by oracle.
Download VirtualBox
To download VirtualBox installer, go to google search & search for “virtualbox download“.
In first search result you will see official website of virtualbox (oracle).
You can also use below link to go to official virtualbox download link.
Official Download Link – VirtualBox
VirtualBox Download google search result will look like as below screen-shot.

Once you go to download page of Virtualbox, you will see the download for different platform like Windows, macOS, Linux.
We are going to install it on windows system so click on “windows hosts” as marked in below screen-shot. Now your download should start automatically.

Once the download is completed , you will see exe file for virtualbox in your download folder as given in screen-shot.

In next step we will look at how to install virtualbox.
Install VirtualBox
To start installation of virtual box, you just need to double click on “VirtualBox-7.0.0-153978-Win.exe” download file or you can right click on that file & select “Run as Administrator“.
After confirming “do you want to allow this app to make changes to your device”, you will see Welcome Page for Virtualbox installation, here click on NEXT.

In License Agreement page, select “I accept the terms in the license agreement” & click on NEXT.

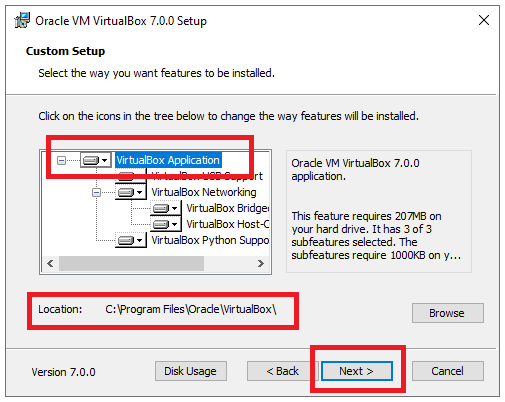
Next page will allow you to customize your virtualbox installation; here we will go with default first option.
You can also change the path of your virtualbox setup by clicking on Browse; by default it will be install inside “c:\Program Files\Oracle\VirtualBox\“. We will go with default path & click on NEXT.
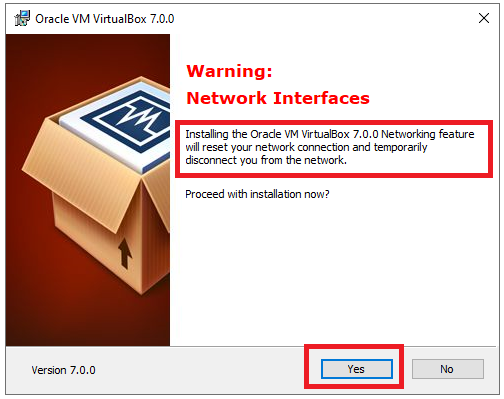
In the next page, you will see Warning about your network connectivity & may your network will be disconnected temporarily. If you are fine with it than click on YES.
Note:- as such I did not face any issue with my internet.
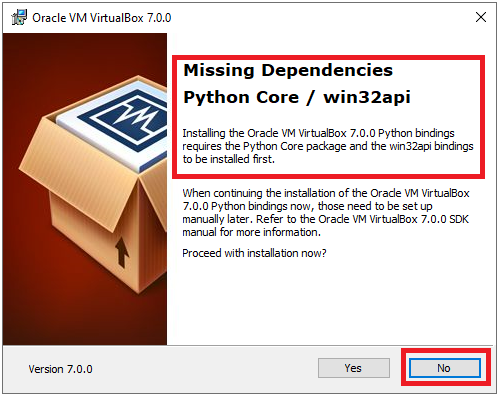
In next page, if you see warning “missing dependencies python core / win32api“, click on NO & abort installation.
To fix above warning, you need to install python on your system & install pywin32 module using “pip install pywin32“
I was able to fix it by installing python 3.7.9 & install pywin32 python module.
After fixing above warning, you need to start installation again.
In the next window, You will see “Ready to Install” page & click on Install button.

Now your virtualbox setup will start & you will see progress for it, please wait till it is completed.

In the last page, you will see completion message for virtualbox. Uncheck box if you don’t want to run it & click on FINISH.

Now you should able to see VirtualBox icon on your desktop, double click on it to run/open it.
![]()
Below is your home page of virtualbox, Now you can install other operating system by clicking on NEW. Please follow specific guideline for each type of OS.

We will cover how to install Ubuntu on Virtualbox.
That’s All. Hope this article helped to install VirtualBox on your system.
Please don’t forget to leave your feedback in below comments section!!